Showing posts with label picasaweb. Show all posts

Monday, January 12, 2009

Making this blog ALT tag friendly

Spot the difference between these two images:



grafitti on wall in Temple Lane, Dublin 2 showing a face in darkened colours peering from a brighter neon coloured doorway

It may not be obvious, but the bottom image now has an ALT tag on it, meaning it's easier for people using screen readers, who have their graphics turned off, who surf the web with a text only browser or who might be on a handheld device.

An ALT tag is a simple bit of code that goes on the end of the image source, which describes what's in the image being shown. The more technical definition is

a HTML tag that provides alternative text when non-textual elements, typically images, cannot be displayed.
As I've said before, I use Picasa for most of the images here, preferring it to the integrated blogger image upload system. To add an image to the blog, what I have to do is copy and paste the code from Picasa to the blog and delete the album hyperlink that comes with it. It's pretty much the same as how I described putting comment buttons on a blogspot blog.

So now, when I have my image code in:
image showing html code for image insert

I just type in
alt="description of what I'm describing"
before the closing > bracket, as highlighted below:

image showing HTML code for image insert with ALT code added in

And that's it! I'll just need to improve my skill at describing what's in a photo. If you have any helpful suggestions, I'd love to hear them.

Wordpress.com users, rejoice. In your image insert function, you can easily specify the alt text, or caption, as shown below.

image showing wordpress.com image functionality

A huge thank you to Digital Darragh for advising me to do this (albeit ages ago!). I hope it improves the experience of this blog somewhat. I'm getting there...

The grafitti/street art by the way is located in a laneway - Palace Street, perhaps - in Dublin 2. Not sure who the artist is but a lot of stuff down there is worth a look.

Tuesday, September 09, 2008

How to put comment buttons on your blogspot blog

From a series of posts including How to comment on a blog and free comment buttons, here's how I put comment buttons on my blog, in 10 easy steps. I hope this makes sense!

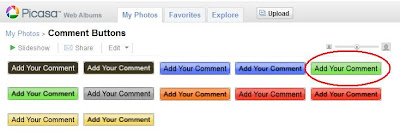
These are examples of the buttons that I use:


And here's how it's done. This may seem complicated at first glance but if you do it once, it should be easy and I hope the screenshots help. Please note - this is only the way I do it - if you know of an easier method, please do share!

1. Go to Iarfhlaith's website where he's made this zip file of his buttons available for download. Leave a comment to say thanks ;o) Extract all the buttons to a folder on your computer.

2. Go to http://picasaweb.google.com - this is a photo and graphic site from Google, and works well with blogspot/blogger. I use Firefox 3.0 for blog writing.

Upload all the buttons to a new Picasa album using the easy upload form. You'll end up with an album looking similar to this:


3. Write your blog post as per usual, keeping Picasa open in a separate tab. Once you've finished your post and are ready to add in your comment button, go to where Picasa is open. Choose and click on the button you'd like to add. For this example I'll choose green.


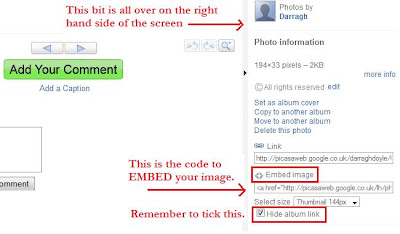
4. Click Embed image on bottom right. Tick the Hide album link box.


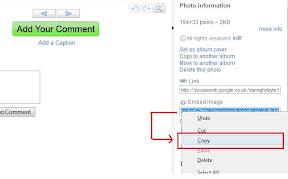
5. Right click with your mouse to copy the code.


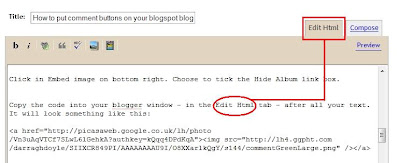
and then paste the code into your Edit Html tab - after all your text. It will look something like this:


6. Then, switch over to the Compose view


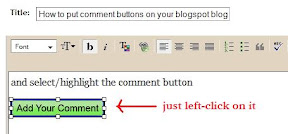
select/highlight the comment button by clicking on it


and centre it using the centre button.


You're nearly finished, I promise. After you fill out your labels and everything, all you have to do is publish your post. First though...

7. Open a new tab with your blog in it.


Press publish on your new post. Once it's published IMMEDIATELY choose to Edit this post again.


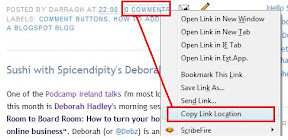
8. Go to the tab with your blog in it and click F5/refresh. You should see your new post there. If everything looks okay, go right down to the end of the post and you'll see a link for 0 Comments. Right click (in Firefox anyhow) and choose to Copy Link Location.


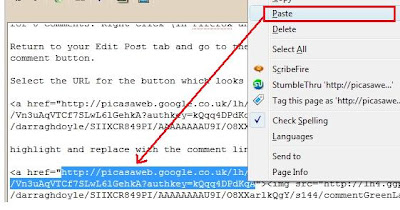
9. Return to your Edit post tab and go to the bottom where you'll see the code for your comment button. Select the URL for the button, then highlight and replace with the comment link.


So the code ends up looking something similar to


10. Press publish and that's it! As I said, it appears daunting at first glance, but follow the step-by-step process and you should be fine. It takes me only a couple of seconds each time I do it at this stage :o)

Give it a go and let me know how you get on, please. Any questions, please do let me know.